If you have Macintosh system software 7.6 or later, you can take a snapshot of a partial area of your Mac's screen. This is useful for saving error messages or a graphic on your computer. You can define the area you want to have captured or have the Mac automatically "snap" a window you select.
Instructions:
Takeing a Snapshot of the whole screen
To take a picture of the whole screen, press Command-Shift-3.
Take a Snapshot of part of the screen on Mac osx-press Command-Shift-4
Part I: Taking a Snapshot of Any Area on the Screen
Step 1
Press Command -Shift -4. Your pointer becomes a crosshair.
Step 2
Drag the crosshair to enclose the portion of the screen you want to snap.
Step 3
Let go of the crosshair. When you hear a click, your Mac has taken a picture of that portion of your screen. The picture will be found on your hard drive with the file name "Picture 1," or a subsequent number if you've snapped more than one picture.
Step 4
Double-click the picture icon to launch SimpleText to see what you've snapped, or open the file in a graphics application to perform more sophisticated editing.
Part II: Taking a Snapshot of a Single Window on Mac OSX
Step 1
Press the Caps Lock key.
Step 2
Press Command + Shift + 4. Your pointer becomes a bull's-eye.
Step 3
Position the bull's-eye over the window or dialog box that you want to snap.
Step 4
Let go of the bull's-eye. When you hear a click, your Mac has taken a picture of the window or dialog box. The picture will be found on your hard drive with the file name "Picture 1," or a subsequent number if you've snapped more than one picture.
Step 5
Double-click the picture icon to launch SimpleText to see what you've snapped, or open the file in a graphics application to perform more sophisticated editing.
Tuesday, May 31, 2011
Sunday, May 29, 2011
How to uninstall Programs on MacBook?
About Apple MacBook- the notebook for everyone
The MacBook is a brand of Macintosh notebook computers built by Apple Inc. First introduced in May 2006, it replaced the iBook and 12-inch PowerBook series of notebooks as a part of the Apple–Intel transition. Positioned as the low end of the MacBook family, the MacBook is aimed at the consumer and education markets.
It is the best-selling Macintosh in history, and according to the sales-research organization NPD Group in October 2008, the mid-range model of the MacBook was the single best-selling laptop of any brand in U.S. retail stores for the preceding five months.
There have been three separate designs of the MacBook: the original model uses a combination of polycarbonate and fiberglass casing that was modelled after the iBook G4. The second type, introduced in October 2008 alongside the 15-inch MacBook Pro, used a similar unibody aluminum casing to the 15-inch Pro, and was updated and rebranded as the 13-inch MacBook Pro at the 2009 Apple Worldwide Developers Conference in June 2009.[3] A third design, introduced in October 2009, uses a unibody polycarbonate shell as aluminum is now reserved for the higher-end MacBook Pro.
How to uninstall Programs on MacBook?
The PC and the Mac have many similarities and many differences. A PC user might swear that her computer is the best, while a Mac user will certainly tell her that she is incorrect. When it comes to installing programs onto a PC or a Mac, the process is similar (although each step is labeled very differently on the Mac than it is on a PC, which can be confusing for anyone who goes from using a PC to a Mac or vice versa). However, uninstalling programs on a Mac is a much faster procedure than doing the same on a PC.
Step by step guide to tell you how to uninstall Programs on MacBook:
Step1
Go to your Mac's desktop screen and double-click on the "Macintosh HD" icon. This will bring up contents such as Applications, System and Library. The icon will look like an external drive and will be silver or gray.
Step 2
Double-click on the "Applications" icon. This will bring up a list all of the applications or software on your Mac.
Step 3
Review the list of applications.
Step 4
Press and hold the "Ctrl" (control) button to bring up a table of options and actions.
Step 5
Click on the operation "Move to Trash." Or you can click on the software and simply drag it to the trash bin on your desktop. Both of these actions will delete the software.
Tips:
If you have the icon for the program that you want to delete on your desktop, then you can drag the icon to your trash bin to delete it.
Make sure that you delete all of the files that are associated with the program.
Thursday, May 26, 2011
How to creat a .zip and upzip file on mac osx Leopard?
Part I Creat a .zip file on mac osx
If you are new to Mac, you might wan to know how to create zip file on Mac OS X. In case you do not know what is zip file, you can refer to here. With the help of zip file, you are able to compress multiple files into one within few mouse clicks and share it with your friends easily.
To create zip files in Mac OS X, follow the steps guide below:
Open your Finder -> Highlight all the files that you wish to create a zip file
Now right click on them, and select “Compress x items”
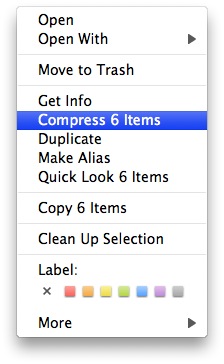
Now you will see a zip file is being created at the same folder with the name of “Archive.zip”
Done! You just created a zip file. Now you can just rename the zip file to a more meaningful name.
Part II Unzip files on mac osx
There are many free unzip software in the market, such as "MacZip for Mac", it's really free.
MacZip is a free tool that includes both zip (for compression) and unzip (for extraction) capabilities. MacZip can compress files for the following systems: Unix, VMS, MS-DOS, OS/2, Windows NT, Minix, Atari, Macintosh, Amiga, and Acorn RISC OS. MacZip also can unzip its own zipped archives. MacZip works with archives produced by PKZip, and PKZip and PKUnzip can work with archives produced by MacZip. In addition, the program supports encryption for secure archive creation.
Free download Free MacZip tool
.
.
Subscribe to:
Posts (Atom)